Someone put their MS in my AWS!

Today, we’re going to get a WASM version of Blazor up and running as a serverless site in AWS. To do this, we’ll be building off of my last post about using CloudFormation. We’ll tackle this big task with the following steps:
- Build a CloudFormation stack that will contain:
- A CodeBuild project
- A S3 Bucket to hold our static site
- A CloudFront Distribution to serve up our site from S3
- Create a Blazor - WASM project in Visual Studio
- Create Dockerfile and docker-compose.yml files to build and publish our project in CodeBuild
- A buildspec.yml for CodeBuild to do the work
Lets get to work!
The Stack
To build the stack, we’re going to use AWS CloudFormation. This is their built in Infrastructure as Code service and is extremely powerful, but can get a little lengthy even for smaller stacks of resources. For purposes of brevity, We’re going to cheat a little bit and re-use a lot of the Cloud Formation stack components used in my previous post. All of the resources we need are the same as regular AWS Serverless site setup.
Lets look at the parameters section, quickly. You’ll want to name your project whatever you wish, a point the ProjectSourceLocation to your github project.
Parameters:
  ProjectName:
    Type: String
    Default: SimpleCloudFormation
    Description: The name of the project we want to make.
  BucketName:
    Type: String
    Default: simple-cloud-formation
    Description: The name of the bucket your site will be held in.
  ProjectSourceLocation:
    Type: String
    Default: "https://github.com/ScienceVikings/SimpleCloudFormation.git"
    Description: Location of the code for CodeBuild to utilize.
To build the application, we need a CodeBuild project. CodeBuild is one of the few things in AWS named for what it actually does. It builds code! We’re going to make use of it to run our docker containers that will build our project and “publish” it.
CodeBuild:
    Type: AWS::CodeBuild::Project
    DependsOn: [S3Bucket, CodeBuildRole]
    Properties:
      Name: !Ref ProjectName
      EncryptionKey: !Join ["",["arn:aws:kms:", !Ref "AWS::Region", ":", !Ref "AWS::AccountId", ":alias/aws/s3"]]
      ServiceRole: !GetAtt [CodeBuildRole, Arn]
      Source:
        Type: GITHUB
        Location: !Ref ProjectSourceLocation
        GitCloneDepth: 1
        # Auth:
        #   Resource: !Ref CodeBuildSourceCredential
        #   Type: OAUTH
      Artifacts:
        Type: S3
        Location: !Ref S3Bucket
        Name: build
        Packaging: NONE
      Environment:
        Type: LINUX_CONTAINER
        Image: "aws/codebuild/standard:4.0"
        ComputeType: "BUILD_GENERAL1_SMALL"
        ImagePullCredentialsType: CODEBUILD
        PrivilegedMode: true
      Triggers:
        Webhook: true
        FilterGroups:
          -  - Type: EVENT
               Pattern: "PUSH, PULL_REQUEST_MERGED"
               ExcludeMatchedPattern: false

  # CodeBuildSourceCredential:
  #   Type: AWS::CodeBuild::SourceCredential
  #   Properties:
  #     AuthType: PERSONAL_ACCESS_TOKEN
  #     ServerType: GITHUB
  #     Token: "{{resolve:secretsmanager:MySecret/Token:SecretString:MyAccessToken}}"
We also need a policy to make sure that our CodeBuild project has access to S3 and CloudFront for any changes it needs to make for the build process. There is a difference between this one and the one in my Simple CloudFormation post. This one adds access to CloudFront invalidations which will help us solve a build issue later on.
CodeBuildRole:
    Type: AWS::IAM::Role
    Properties:
      RoleName: !Join ["",['CodeBuild-', !Ref ProjectName]]
      Path: /service-role/
      Policies:
        - PolicyName: !Join ["",['CodeBuildBasePolicy-', !Ref ProjectName]]
          PolicyDocument:
            Statement:
              - Effect: Allow
                Resource:
                  - !Join ["",["arn:aws:logs:", !Ref "AWS::Region", ":", !Ref "AWS::AccountId", ":log-group:/aws/codebuild/", !Ref ProjectName]]
                  - !Join ["",["arn:aws:logs:", !Ref "AWS::Region", ":", !Ref "AWS::AccountId", ":log-group:/aws/codebuild/", !Ref ProjectName, ":*"]]
                Action:
                  - "logs:CreateLogGroup"
                  - "logs:CreateLogStream"
                  - "logs:PutLogEvents"
              - Effect: Allow
                Resource:
                  - !Join ["",["arn:aws:s3:::", !Ref BucketName]]
                  - !Join ["",["arn:aws:s3:::", !Ref BucketName, "/*"]]
                Action:
                  - "s3:PutObject"
                  - "s3:GetBucketAcl"
                  - "s3:GetBucketLocation"
                  - "s3:ListBucket"
              - Effect: Allow
                Resource: "*"
                Action: ["cloudfront:CreateInvalidation"]
      AssumeRolePolicyDocument:
        Version: 2012-10-17
        Statement:
          - Effect: Allow
            Principal:
              Service:
              - codebuild.amazonaws.com
            Action:
              - 'sts:AssumeRole'
Next, we’ll need the main site resources. For this, we’ll need the S3 bucket to hold our site and a security policy that will allow our CloudFront resource access to serve up what is inside.
Resources:

  S3Bucket:
    DeletionPolicy: 'Delete'
    Properties:
      AccessControl: 'Private'
      BucketName: !Ref BucketName
    Type: 'AWS::S3::Bucket'

  S3BucketPolicy:
    Properties:
      Bucket: !Ref S3Bucket
      PolicyDocument:
        Statement:
          - Action:
              - 's3:GetObject'
            Effect: 'Allow'
            Principal:
              CanonicalUser: !GetAtt CloudFrontOriginAccessIdentity.S3CanonicalUserId
            Resource:
              - !Sub 'arn:aws:s3:::${S3Bucket}/*'
    Type: 'AWS::S3::BucketPolicy'
Now lets take a look at CloudFront itself. CloudFront is technically a Content Delivery Network service used to make accessing your static files ultra fast. Lucky for us, our entire site is considered static! There is a small caveat about CloudFront we’ll need to address later when doing builds through CodeBuild but we’ll take care of that when we address the buildspec. The CloudFront and CloudFrontOriginAccessIdentity resources set up the CloudFront requirements with some mostly default parameters and makes sure that only the content of our S3 site can be accessed through it.
CloudFront:
    Properties:
      DistributionConfig:
        # Aliases: [ "mysite.example.com" ]
        # ViewerCertificate:
        #   AcmCertificateArn: !Ref ACMCert
        #   SslSupportMethod: sni-only
        DefaultCacheBehavior:
          AllowedMethods:
            - 'HEAD'
            - 'GET'
          CachedMethods:
            - 'HEAD'
            - 'GET'
          Compress: false
          DefaultTTL: 86400
          ForwardedValues:
            Cookies:
              Forward: 'none'
            Headers:
              - 'Origin'
            QueryString: false
          MaxTTL: 31536000
          MinTTL: 86400
          TargetOriginId: !Sub 's3-origin-${S3Bucket}'
          ViewerProtocolPolicy: 'redirect-to-https'
        DefaultRootObject: 'index.html'
        Enabled: true
        HttpVersion: 'http1.1'
        IPV6Enabled: false
        Origins:
          - DomainName: !GetAtt S3Bucket.DomainName
            Id: !Sub 's3-origin-${S3Bucket}'
            OriginPath: ''
            S3OriginConfig:
              OriginAccessIdentity: !Sub 'origin-access-identity/cloudfront/${CloudFrontOriginAccessIdentity}'
        PriceClass: 'PriceClass_All'
    Type: 'AWS::CloudFront::Distribution'

  CloudFrontOriginAccessIdentity:
    Metadata:
      Comment: 'Access S3 bucket content only through CloudFront'
    Properties:
      CloudFrontOriginAccessIdentityConfig:
        Comment: 'Access S3 bucket content only through CloudFront'
    Type: 'AWS::CloudFront::CloudFrontOriginAccessIdentity'

  # ACMCert:
  #   Type: "AWS::CertificateManager::Certificate"
  #   Properties:
  #     DomainName: "mysite.example.com"
  #     ValidationMethod: DNS
We’re going to want to know the auto-generated information from CloudFront to be able to setup invalidations and possibly sub-domains later, so lets output the generated domain name and CloudFront ID.
Outputs:
  CloudFrontDomainName:
    Value: !GetAtt CloudFront.DomainName
  CloudFrontId:
    Value: !Ref CloudFront
The Blazor
Here we’re going to just make a simple Blazor WASM site. For this we’re just going to use the base example project that comes with the project template. We’ll elaborate more on adding features in a future post.
Make sure you have the latest dotnet 5.0 framework installed then crack open Visual Studio 2019.
When you create a new project, you’re going to want to make sure you choose the Blazor Template. 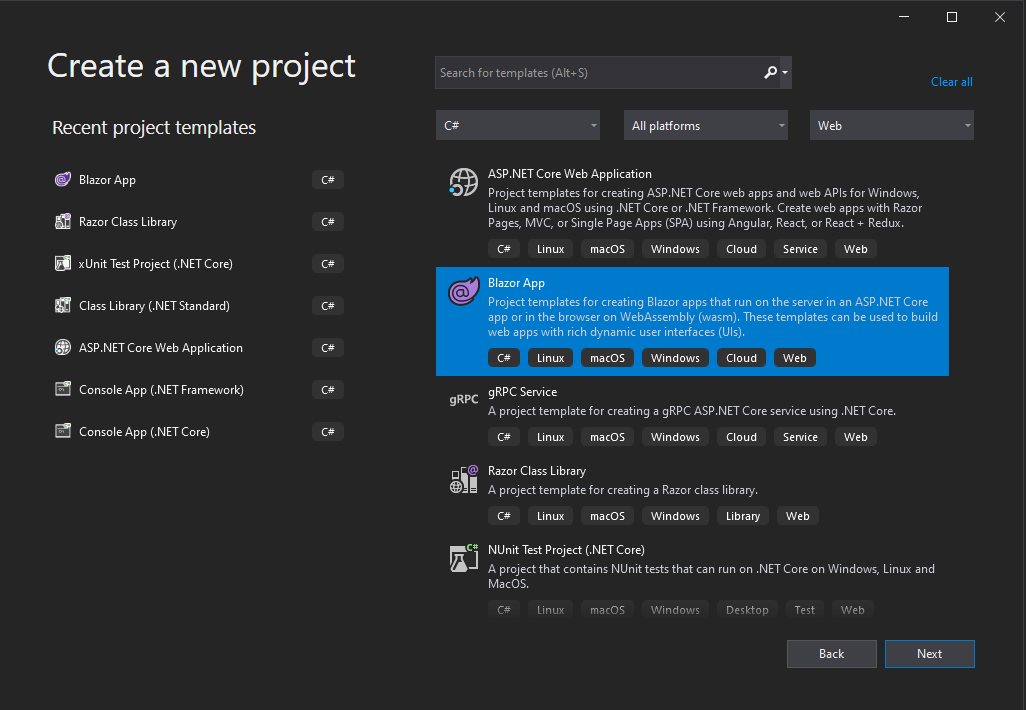
Then, make sure you choose the .NET 5.0 Framework in the drop down near the top and select the Blazor WASM version of the template. 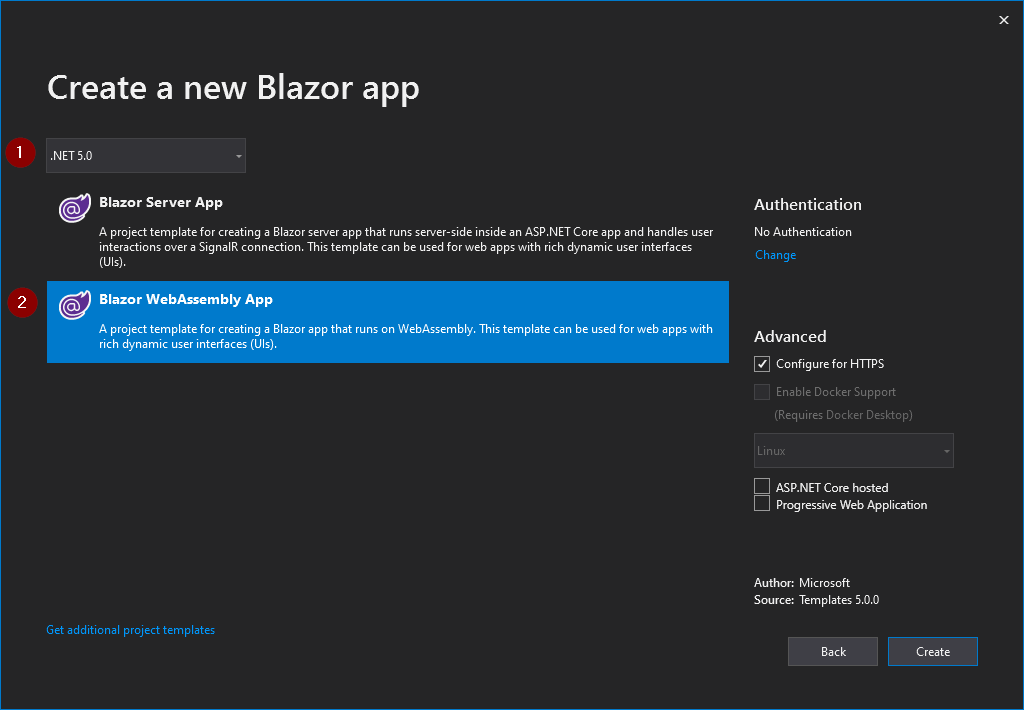
Click create and you’re done! Now, make sure you have a github or equivalent git repository setup for it and make sure that URL is setup in the params of your CloudFormation stack file. That way CodeBuild will know where to pull the code from for building.
The Dockerfile
Our Dockerfile will be using the latest dotnet 5.0 SDK image to build our project. We’ll simply copy the solution into the container, restore the packages and publish in release mode to a build directory. This directory name is important because we’ll be pulling those files out later on to publish them to S3.
FROM mcr.microsoft.com/dotnet/sdk:5.0 AS build
WORKDIR /app

COPY . .
RUN dotnet restore

WORKDIR /app/ServerlessBlazor/
RUN dotnet publish -c Release -o build
To make our lives a little easier, we can run this docker build through docker-compose. When we use these files in CodeBuild, we’ll basically setup the site to publish inside the container and pull those published files out.
version: "3.8"
services:
  site:
    container_name: serverless-blazor
    build: .
    command: dotnet run /app/ServerlessBlazor
The Buildspec
Finally, we need to make sure things can actually build in CodeBuild. To do this we’re using a buildspec.yml file. The file is going to bring up our Blazor site in a docker container. This will build the project and publish it to a directory. Then we’re going to copy those files out into our own directory and sync them with S3.
Normally from here, you’d be done publishing your site, but CloudFront has different plans. You see, CloudFront does some major caching of files at it’s edge locations to keep everything as fast as possible. When we publish our new static site to S3, the old verion is still cached and we need to tell CloudFront to invalidate that cache. This is my we gave CodeBuild invalidation permissions to CloudFront. The final step of our buildspec is to invalidate the site with CloudFront so it will serve up our newest content immediately.
version: 0.2

phases:
  build:
    commands:
      - set -e
      - docker-compose up -d site
      - docker cp serverless-blazor:/app/ServerlessBlazor/build/wwwroot .
      - docker-compose down
      - aws s3 sync ./wwwroot s3://<YOUR S3 BUCKET NAME>
      - aws cloudfront create-invalidation --distribution-id <YOUR CLOUDFRONT DISTRIBUTION ID> --paths "/*"
Conclusion
By now you either have or are ready to run your CloudFormation stack in AWS and commit your code so CodeBuild can kick off! Once the build passes, you can check the outputs of the CloudFormation stack to see what domain CloudFront assigned it, go there and see your new site!
We got a lot done here today. We built a CloudFormation stack that will manage the resources needed to host our WASM site. We made a repository for and started building our Blazor WASM site itself, and we published it to S3 so CloudFront could host it for us. Now when we want to make changes, we can simply do so, commit the code and once the build is finished our changes are up and out for the whole world to see automatically.
I hope this information was helpful in setting up a Blazor WASM site in the AWS Cloud space. The scope of this post was to directly address the CI/CD pipeline aspect of things. In a future post I’ll be addressing how to setup Lambdas for use with your Blazor WASM site and how to incorporate those in your build process.