Windows Development on a Mac
I recently took the plunge into becoming a contracting developer. One of the most difficult things to decide is, what kind of hardware do I use? What kind of work should I focus on? How do I make sure I can handle whatever work comes across my path?
For me, I do a little bit of everything. I’ve done a lot of app development in the past, but my current client needs help with their .NET Framework projects. If you’re planning on doing any iOS development you most definitely need an Apple machine. The good thing about getting a Mac is that you can run any operating system you’d like on it, with the help of a little software. This post is about how I setup my Mac so I could get the best of both worlds and do iOS and Windows Development from the same machine.
Now, this has probably been gone over a billion times and is definitely a lot of personal preference but I am really excited about how I have things set up and I just have to share it with people.
Hardware
Like I said earlier, if you are going to do iOS or MacOS development you almost definetly need to have an Apple machine. There are certainly ways around it with tools like Nevercode/CodeMagic and hosted Mac VMs, but, if you’re doing it professionally you’re definitely going to appreciate the instant feedback of having the tools right at your finger tips.
This can be tremendously expensive, as Apple products are generally extremely expensive. You can get by with finding some used equipment, but if you’re going to use a Windows VM you’re going to need a decent amount of drive space and memory so you can run everything.
Personally, I went with a 16” Macbook Pro with 2TB storage and 32GB of RAM. The video card and other things didn’t matter as much to me as this is for development and I don’t do a lot of game development as of late. If I’m going to do game dev, I’d do that on my PC that has a gaming graphics card.
Software
If you’re going to do this right, you need the right software. This also can be expensive, but let me tell you, once things are setup it is so nice.
First, lets talk about the Mac side of things. You will absolutely need to use VS Code, or your favorite editor of choice.
I highly recommend VS Code because it is fast, can handle large files and has an unbelieveable extension library that can do everything from manage docker assets, to query databases. There is even one that lets you write an HTTP Request right in line, and fire it off to get results.
Next, you are most definitely going to want to use Docker. If you aren’t familiar with Docker, go ahead and shoot me an e-mail and if there is some interest, I’ll write an introduction to Docker blog post. Docker “containerizes” your applications to make things easy to start up quickly, make them transferrable between developers and just generally feels cleaner than installing a bunch of software applications and having to remember configurations for everything you couldn’t export from your last project.
To do the Windows development side of things, you’ll also need a VM solution. There are two that I see as the leaders here, Parallels and VM Fusion. This mostly comes down to personal preference, but I chose VM Fusion.
The reason for this was quite simple. I knew about Parallels first and preliminary search results for reviews turned up some negative information. Once I asked a friend about what he thought, he said he didn’t know much about Parallels and showed me VM Fusion. After looking at the pricing models and features of the two, I felt like VM Fusion was the solution for me and so far, it’s been amazing!
At the time of this writing, VM Fusion was both cheaper than Parallels and a one time buy. Where as, Parallels was a little more expensive with a recurring fee. That was another reason that I chose VM Fusion over Parallels.
One big reason to try and save money on the VM Software is because you’re going to need that cash for a Windows license. Since I was doing web development work and needed to be able to create an IIS Server, I bought a Windows Pro license and those run about $200, but is a must have if you’re going to be developing in Windows on your Mac.
XCode is the last piece of software you’re definitely going to need if you’re doing and iOS or MacOS development. It’s the official Apple development tool and comes with everything you need to write apps. Luckily, unlike most Apple products, this is a free download through the App Store.
Optional Software
Here I’d like to talk about some optional software that I use and love. A lot of other bits are up to personal preference or required by your work, like your browser, your source control utilities and your chat clients, such as Slack, Microsoft Teams and maybe even Discord.
I use git as my source control tool. Along with GitHub and BitBucket, I use SourceTree as my git client. I love command line tools, and we’ll get to those in a moment, but for git I need something more visual.
Laziness is one of a developer’s best qualities and to be more lazy, you need tools that allow you to be more lazy. Mac has a tool called Spotlight, which is fine for quickly searching things and what not, but if you really want to get things done fast, I highly recommend the app Alfred with the Powerpack. You can write custom work flows that you can trigger from different things and customize it almost any way you want. I can’t recommend it highly enough and it is essential to my arsenal of tools.
My new favorite IDE has become Rider. While Visual Studio proper is fine, Rider has some amazing features that blow it out of the water. For example, you don’t even need to install SQL Management Studio if you use Rider, because it has better features than that tool! The find anything feature is a dream, and boy is it fast. The only gotchas I’ve seen so far is that Rider can’t run T4 templates, and it doesn’t have the publishing features that VS does. For those, you’ll probably want VS installed on the side.
This last bit definitely comes down to personal preference, but I would suggest making your terminal feel like home with some theming and tooling. I use OhMyZsh with the Powerlevel10K theme and absolutely love it.
Bringing it all together
Now that you have all your software downloaded and installed, you need to do a little setup to bring it all together. First, you want to make sure that your VM Fusion is setup to allow sharing between the Mac and the Windows side of things. Although Rider doesn’t work well with networked drives, it’s tremendously helpful to have those things shared. Because Rider doesn’t like networked drives, I had to install SourceTree on both the Windows and Mac side of things.
Next, you need a way for your Windows VM to know your Mac exists. VM Fusion will give you an IP address to access the Mac from your Windows VM, so I setup a line in the hosts file to point to this IP and gave it the name mac.host. The hosts file for Windows is located at C:\Windows\System32\drivers\etc\hosts and needs admin permissions to edit. This way you can refer to things running in Docker with the host name instead of having to remember an IP address.
That brings me to my next topic, databases. I’m doing Windows development, which requires some SQL Server database, but I don’t want to install SQL Server, or even Management Studio for that matter. Here is where Docker comes to the rescue. Microsoft has a SQL Server Docker image and it’s one of the most useful tools in our arsenal. Any database I have, I run from my Mac side, in Docker and open the port up to that container. Then, for example with SQL Server, I can point any connection string on the Windows side of things to mac.host and we’re connected.
Here are a few examples of how I got it setup with docker-compose and some bash scripts to restore database backups, and run scripts. If you have a lot of scripts to run, I’d suggest something like Roundhouse or any other script management tool you can run from docker.
version: "3.8"

services:

  ms-db:
    image: mcr.microsoft.com/mssql/server:2017-latest
    container_name: ms_db
    ports:
      - "1433:1433"
    environment:
      - "ACCEPT_EULA=Y"
      - "SA_PASSWORD=mysecretpassword!"
    volumes:
      - ms_db:/var/opt/mssql
      - ./backup:/backup
      - ./scripts:/scripts
    networks:
      - database

volumes:
  ms_db:

networks:
  database:
Run this file with docker-compose up or docker-compose up -d to get the server started. You can test connections from the mac by connecting to mac.host and it uses the default port for SQL server.
#!/bin/bash

CONTAINER="ms_db"
PASS="mysecretpassword!"

BAKS=$(ls -r backup/*.bak)

for BAK in $BAKS
do
    echo "Restoring backup: $BAK"

    # echo "RESTORE FILELISTONLY FROM DISK = '/$BAK'"

    VOLS=$(docker exec -it $CONTAINER /opt/mssql-tools/bin/sqlcmd \
        -S localhost -U SA -P $PASS \
        -Q "RESTORE FILELISTONLY FROM DISK = '/$BAK'" \
         | tr -s ' ' | cut -d ' ' -f 1 | sed 1,2d | tail -r | sed 1,2d | tail -r)

    i=0
    SQL="RESTORE DATABASE "
    for VOL in $VOLS
    do

        if [[ $i -eq 0 ]]
        then
            SQL+="$VOL FROM DISK = '/$BAK' WITH MOVE '$VOL' TO '/var/opt/mssql/data/$VOL.mdf'"
        else
            SQL+=", MOVE '$VOL' TO '/var/opt/mssql/data/$VOL.ldf'"
        fi
        i+=1
    done

    # echo $SQL

    docker exec -it $CONTAINER /opt/mssql-tools/bin/sqlcmd \
        -S localhost -U SA -P $PASS \
        -Q "$SQL"

done
Create a folder next to the docker-compose file called backup and put your SQL Backups *.bak files in there and then run the restore-all.sh script. It will loop through the backup files in there and restore the databases in your container.
If you look closely on line 14, you’ll see a volume ms_db:/var/opt/mssql. This sets up a Docker volume on your host machine and shares it with the container so SQL Server can persist the databases between the containers coming up and down.
#!/bin/bash

if [ -z "$1" ]
then
    echo "Please specify a script"
    exit 1
fi

CONTAINER="ms_db"
PASS="mysecretpassword!"
SCRIPT=$1

docker exec -it $CONTAINER /opt/mssql-tools/bin/sqlcmd \
        -S localhost -U SA -P $PASS \
        -i "/$SCRIPT"
Now, make another folder next to the docker-compose file called scripts and put any scripts you need to run in that folder. The run-script.sh file only runs one script at a time, but you can use it in another script to automate running all the scripts in that folder if you’d like. I’ll leave that as an exercise for the reader.
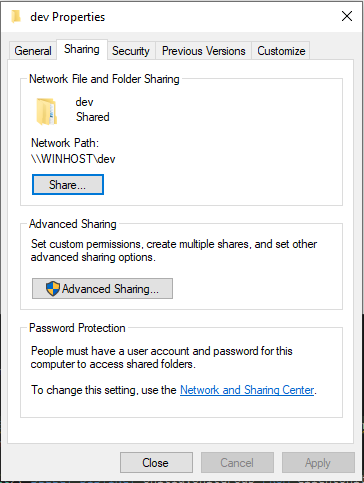
One more thing about docker. I tend to have to search through a lot of code in separate projects at once. The best way I’ve found to do this is to create a shared drive on the Windows VM, using the standard Sharing tools
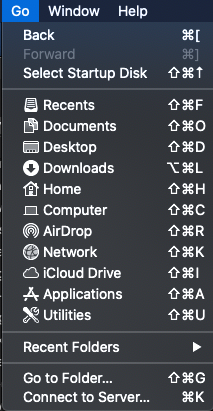
Then, on the Mac side of things mount that shared folder and name it whatever you’d like. It will show up in /Volumes/<your-shared-name>
You can then shared that volume using docker and then that container will have access to the Windows side of code for anything. Here is an example docker-compose file that uses the shared volume, once it’s mounted.
Here is an example Dockerfile and docker-compose file that creates an image with a bunch of useful tools and also uses ZSH like my Mac. I use ripgrep for searching and jq for querying any JSON output I come across. Both useful tools, and you should feel free to add more things to this container if you need them. Let me know if I’m missing anything you find useful.
FROM ubuntu:latest
ENV TERM xterm-256color
WORKDIR /root
RUN apt-get update \
 && apt-get install -y \
ripgrep \
jq \
zsh \
curl \
git
RUN sh -c "$(curl -fsSL https://raw.github.com/ohmyzsh/ohmyzsh/master/tools/install.sh)"
RUN git clone --depth=1 https://github.com/romkatv/powerlevel10k.git ${ZSH_CUSTOM:-$HOME/.oh-my-zsh/custom}/themes/powerlevel10k
COPY . /root
WORKDIR /code
ENTRYPOINT ["/bin/zsh"]
version: "3.8"
services:

  tools:
    hostname: tools
    container_name: tools
    build:
      context: ./tools
    volumes:
      - "/Volumes/dev:/code"
    stdin_open: true
    tty: true
As you can see on line 10 of the docker-compose-tools.yml file, I’m sharing the Volume I have mounted from my Windows VM.
Conclusion
That wraps up how I have my equipment set up. I am over the moon about my setup, but could probably tweak it and make tiny Docker tools all day, every day. Being able to develop for anything gives me a tremendous amount of freedom to try anything and everything and I hope seeing how I have things set up will inspire you to set yourself up for success. If you’re really excited about how you have things set up, e-mail me and let me know. I’m always excited to hear about cool new tools and ways to be more productive.