Using .Net 5 to build AWS Lambdas

Check out how to build an AWS Lambda using .Net 5
Today we’re going to talk about how you can build yourself a fancy AWS Lambda using .Net 5.
If you need a template to start from, fork this repo and use it as a template for your project. I’m going to explain how it is setup, NuGet packages required, and how to setup a Host for proper dependency injection and all the nice things that come along with it.
This will require you to have Docker installed. The docker setup is already in the templates as well, if you are unfamiliar with the system.
The Solution Setup
First, we’re going to want to create a new solution with a Console App (.NET Core) project.
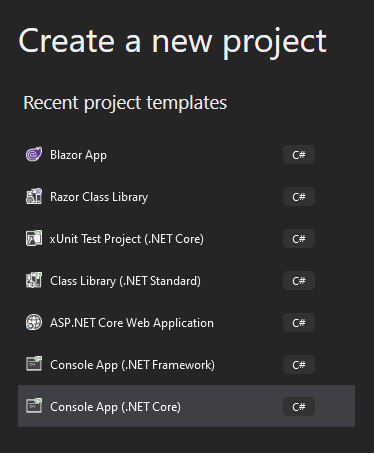
You’d think we would only need a class library, but that isn’t the case. The tools running our lambda need a file ending in .runtimeconfig.json which doesn’t get generated from a class library project. We can just ignore the Main method, since we’ll be making our own handler and the lambda won’t touch it anyway.
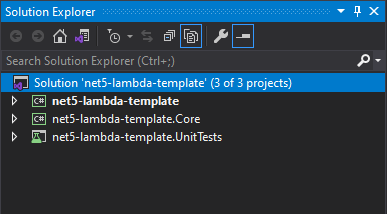
I like to break my solution out into multiple projects as you’ll see in the template repo. The main console project will have just what is required to hook into the lambda tools. The .Core project will be the meat and potatoes of our code. It will contain our host, services, etc. Then, of course, we’ll have a .UnitTests project to make sure everything is working because, as I love to say, your code is only as good as your tests!
NuGet Packages
In our main console project, we’re going to need a few AWS packages to get us going. Open up your package manager and pull down
- Amazon.Lambda.Core
- Amazon.Lambda.Serialization.Json
In our .Core project we’re going to need the packages required to setup our Host
- Microsoft.Extensions.Configuration.Json
- Microsoft.Extensions.DependencyInjection
- Microsoft.Extensions.Hosting
- Microsoft.Extensions.Hosting.Abstractions
And, while this is optional, I highly recommend using Shouldly in your .UnitTests project for your assertions.
Connecting Wires
Lets get our handler going, just to make sure our wires connect, before going any further. In the console project, create a class and give it a function that takes a string as input, and returns a string. Here is an example.
using Amazon.Lambda.Core;

[assembly:LambdaSerializer(typeof(Amazon.Lambda.Serialization.Json.JsonSerializer))]
namespace net5_lambda_template
{
    public class LambdaFunction
    {
        public string Handler(string input)
        {
            Console.WriteLine(input);
            return input.ToUpper();
        }
    }
}
We’re just going to print out what we got and return the input in all caps to make sure things are working.
The way AWS is handling the lambda work is through their docker image public.ecr.aws/lambda/dotnet:5.0. So, we’ll setup a Dockerfile and docker-compose.yml file to do all that heavy lifting for us. We’ll also write a little shell script, run.cmd that will run all our commands for us in one go, because remembering to do things stinks. Place all these files right in your solution directory.
Lets take a look at our Dockerfile.
FROM public.ecr.aws/lambda/dotnet:5.0
#You can alternately also pull these images from DockerHub amazon/aws-lambda-dotnet:5.0

# Copy function code
COPY net5-lambda-template/bin/Debug/net5.0 ${LAMBDA_TASK_ROOT}

# Set the CMD to your handler (could also be done as a parameter override outside of the Dockerfile)
CMD [ "net5-lambda-template::net5_lambda_template.LambdaFunction::Handler" ]
This is pretty straight forward. We’re using the AWS public.ecr.aws/lambda/dotnet:5.0 image, then copying our build artifacts into a location defined by that image in ${LAMBDA_TASK_ROOT}. This generally ends up being /var/task in the container itself.
Next we have the CMD command. We need to pass this our handler. It is setup in this format: <project name>::<namespace>.<class name>::<function name>. If you get it wrong, the lambda will let you know with a panic and give a message Failed to send default error response: ErrInvalidInvokeID.
To make building and running this easier, lets use docker-compose
version: "3.8"
services:

  lambda:
    container_name: lambda
    build: .
    image: com.sciencevikinglabs.lambda
    stdin_open: true
    tty: true
In here we’re just setting up nice names for our containers and images. Change those to whatever you please. The stdin_open and tty settings are needed since we’re going to be running this container instead of letting it go in the background.
Now for our run.cmd script
dotnet build .\net5-lambda-template.sln
docker-compose build
docker-compose run -p 9000:8080 lambda
This just builds our solution in dotnet, builds our docker image and then runs it.
The Host
Technically, you have all you need to get going, but I wanted to also show you how to setup a Host to run an application.
public class LambdaHost
{
    public IHostBuilder HostBuilder => GetHostBuilder();

    private IHostBuilder _hostBuilder;
    private readonly string[] _hostArguments;

    public LambdaHost(string[] args)
    {
        _hostArguments = args;
    }

    private IHostBuilder GetHostBuilder()
    {
        if (_hostBuilder != null)
            return _hostBuilder;

        _hostBuilder = Host.CreateDefaultBuilder(_hostArguments)
            .ConfigureServices(ConfigureServicesInternal);

        return _hostBuilder;

    }

    private static void ConfigureServicesInternal(IServiceCollection services)
    {
        services.AddTransient<LambdaApplication>();
    }
}
The GetHostBuilder function creates a builder for us and then calls our ConfigureServicesInternal function and returns. If it already exists, we return the one we already made. No reason for more than one host.
The ConfigureServicesInternal function is where we’ll add our services to the host dependency injection container. We’ll add our application here so we can use it later on in our lambda.
Lets take a peek at what our application is actually doing
public class LambdaApplication
{
    public string DoTheJob(string input)
    {
        Console.WriteLine(input);
        return input.ToUpper();
    }
}
Pretty simple. And now that we have that all set up, we can plop it into our lambda’s Handler function and call it a day!
using Amazon.Lambda.Core;
using Microsoft.Extensions.DependencyInjection;
using net5_lambda_template.Core;

[assembly:LambdaSerializer(typeof(Amazon.Lambda.Serialization.Json.JsonSerializer))]
namespace net5_lambda_template
{
    public class LambdaFunction
    {
        public string Handler(string input)
        {
            var host = new LambdaHost(null);
            var services = host.HostBuilder.Build().Services;
            var app = services.GetService<LambdaApplication>();

            return app.DoTheJob(input);
        }
    }
}
Conclusion
There you have it! Now you can build lambdas and run them locally for testing in docker. Again, a template repo is available if you want to just fork it and get started right away. I hope this was helpful and good luck with your lambda-ing!