Ionic Getting Started

- The Install
- Creating a Project
- Things to Think About
- Quick Review
- Making an App
- The Lay of the Land
- The Weather Service
- The Weather State
- The Device
- Conclusion
The Install
Getting everything properly installed for Cordova to run on Android can be a pain. You need NodeJS, the Java JDK, ANT and then the Android SDK. If you haven’t done any of that, you can follow this previous post about setting up Cordova to get what you need for an Ionic application. We’re leaving the iOS setup as an exercise for the reader for now.
Once all that is installed, open up your favorite terminal and install the Ionic package with npm install -g ionic This will install ionic globally on your machine. You unix wizards will probably need to prefix a sudo on there, but you knew that.
Creating a Project
The easy way to just start a simple tab based throw away app is to go to the directory you want it in with a command prompt and run ionic start myApp where myApp is the name of the directory you want the project to be stored in. But, if you want to name things nicely, there is a little more to think about.
Things to Think About
If you want to configure the name and id of your app a little more easily, you can supply those values as you configure your app with the command line options. The -a "My App" option will let you set the human readable name for your app. This will show up under the icon on the device. The -i com.coolestdudesever.myapp option will set the reverse-domain id of the app.
You can also setup different templates as well. If you don’t want to start with the default tabs template you can also have sidemenu or even just a vanilla blank project.
An example of a side menu app being initialized properly would looks something like the this: ionic start -a "My App" -i com.coolestdudesever.myapp myApp sidemenu
This will initialize a side menu Ionic app in the myApp folder, all ready to be hacked on.
Quick Review
- Install NodeJS, Java JDK, Ant, Android SDK (reference)
- npm install -g ionic
- ionic start [options]
[template] - -a “My App Name”
- -i com.mydomain.id
- tabs, sidemenu or blank template
- defaults to tabs if template is omitted.
Making an App
For this intro app we’re not going to get all boring with the usual To-Do List app. that horse has been kicked to death, back to life and to death again. Lets use OpenWeatherMap and make a weather app.
We’ll call it “Weather Or Not” because I rarely make sense. The command used to initialize the project was ionic start -a "Weather Or Not" -i com.sciencevikinglabs.weatherornot WeatherOrNot sidemenu
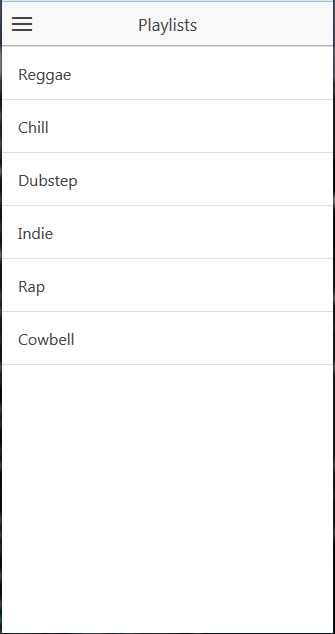
Now that we have an app, change directories into the project folder it created and test it out by running ionic serve in your command prompt. This should bring up a browser with the newly created Ionic application. The default side menu Ionic template shows up with some crazy playlist thing. You’ll notice that if you start editing JS files and saving them that the ionic server will reload automatically. Click around a bit and get a feel for the app as it stands. We’ll gut it like a fish next.
The Lay of the Land
The side menu Ionic template provides a couple files for us and does some nice decoupling for us by separating our controllers into their own angular module outside of the main application. Open up www/js/app.js in your favorite IDE and take a look at the starter module provided by Ionic.
Find the config function in the file. Ionic uses ui-router which lets you organize your app into states, rather than having to think about URLs.
Here we can see he hierarchy that Ionic initialized for us. Clicking around the app in the browser and viewing the templates can give you a good feel of how everything is organized. For the weather app we’re only going to have two screens. The main screen will be our weather, and the second screen will be an about page, giving acknowledgement to OpenWeatherMap. We’ll also be removing the AppCtrl controller since we won’t be needing it. We’ll use $urlRouterProvider.otherwise() to have our app load up the weather state of the app when it’s loaded.
We’re also going to alter the www/templates/menu.html file to include the new items, and remove the otherwise that we don’t need or have to care about.
.config(function($stateProvider, $urlRouterProvider) {
  $stateProvider

    .state('app', {
    url: '/app',
    abstract: true,
    templateUrl: 'templates/menu.html'
  })

  .state('app.weather', {
    url: '/weather',
    views: {
      'menuContent': {
        templateUrl: 'templates/weather.html',
        controller: 'WeatherCtrl'
      }
    }
  })

  .state('app.about', {
      url: '/about',
      views: {
        'menuContent': {
          templateUrl: 'templates/about.html'
        }
      }
    });
  // if none of the above states are matched, use this as the fallback
  $urlRouterProvider.otherwise('/app/weather');
});
<ion-side-menus enable-menu-with-back-views="false">
  <ion-side-menu-content>
    <ion-nav-bar class="bar-stable">
      <ion-nav-back-button>
      </ion-nav-back-button>

      <ion-nav-buttons side="left">
        <button class="button button-icon button-clear ion-navicon" menu-toggle="left">
        </button>
      </ion-nav-buttons>
    </ion-nav-bar>
    <ion-nav-view name="menuContent"></ion-nav-view>
  </ion-side-menu-content>

  <ion-side-menu side="left">
    <ion-header-bar class="bar-stable">
      <h1 class="title">Menu</h1>
    </ion-header-bar>
    <ion-content>
      <ion-list>
        <ion-item menu-close href="#/app/weather">
          Weather
        </ion-item>
        <ion-item menu-close href="#/app/about">
          About
        </ion-item>
      </ion-list>
    </ion-content>
  </ion-side-menu>
</ion-side-menus>
For the sake of simplicity, we’re going to keep the controller we’re using in the controllers.js file Ionic created for us. If this were a larger app, personally, I would separate the controllers into their own files under a controllers folder. Keeping things organized will make you happy, so just do it.
The Weather Service
For the main source of our data we’ll build using an AngularJS service. Lets call it weather. I’ll create weather.js under www/js/weather.js and add the reference to the www/index.html file. Lets follow the separation of concerns Ionic started for us and make our own module to contain this service as well. I’m going to call the module openWeatherMap and create a factory called weather. This service will be strictly an interface into the OpenWeatherMap data.
We’ll need the $http service to make our API call, so add that as a dependency to the factory. Also, promises are a good way to gather our data asynchronously when it’s complete, so we’ll use the $q service to give use the ability to use them.
Lets let our users put in a zip code to get a their weather data. To do this, we’ll create a function called getWeatherByZipCode for our service. The function will return a promise that our controller can use to manipulate the data when it’s complete. One more knit-picky thing is that we’re only allowing US zip codes for now.
If there is a problem with the zip code we send the URL, it’ll return a JSON string containing a cod parameter of 400. First we’ll check if that exists, and reject our promise if that’s the case. Otherwise, we’ll just ship the data we get from the API along to whatever is using the service.
angular.module('openWeatherMap',[])
.factory('weather', ['$http', '$q', function($http, $q){

  var weather = {};

  weather.getWeatherByZipCode = function(zipCode){
    var defered = $q.defer();
    $http.get('http://api.openweathermap.org/data/2.5/weather?zip=' + zipCode + ',us&units=imperial')
    .success(function(data, status, headers, config){
      if(data.cod !=  200){
        defered.reject(data.message);
      } else {
        defered.resolve(data);
      }
    })
    .error(function(data, status, headers, config){
      defered.reject('Error in API');
    });
    return defered.promise;
  };

  return weather;
}]);
Back in the controllers.js file, add in the module as a dependency to our starter.controllers module, so we can use it in our WeatherCtrl controller.
The Weather State
Now that we have our data source, lets use it. We’ll need to update the view and the weather controller to interact with the service.
The View
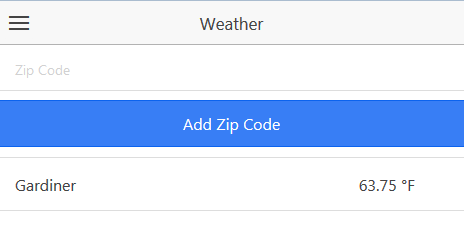
For the sake of simplicity, we’ll just create an input field, and a button that will call the weather service and add that zip code to the list of cities we care about. In our list, we can slide the items to the left, and reveal a refresh button to reload the data.
<ion-view view-title="Weather">
  <ion-content>
    <label class="item item-input">
      <input type="text" placeholder="Zip Code" ng-model="input.zipCode">
    </label>
    <button class="button button-full button-positive" ng-click="addZipCode()">
      Add Zip Code
    </button>
    <ion-list>
      <ion-item ng-repeat="weather in cities">
        <div style="float: left;">

        </div>
        <div style="float: right;">
           °F
        </div>
        <ion-option-button class="button-balanced" ng-click="refresh(weather.zipCode, $index)">Refresh</ion-option-button>
      </ion-item>
    </ion-list>
  </ion-content>
</ion-view>
The Controller
Here we need to setup some scope variables and functions to make all our buttons and inputs work. First we initialize $scope.cities to an empty array and $scope.input to an empty javascript object. In the view, you can see we use the cities in the ng-repeat and the input to contain the zip code entry.
The screen has two buttons that effectively do the same thing, gather weather info. The Add Zip Code button just grabs it initially, while the Refresh buttons will update it. So, to consolidate that logic, we create an onZipCodeData function that handles our data gathering, massaging and error handling. It then fires a callback when the data is ready. This is different than promises, and promises could have also been used here, but I wanted to quickly show the different ways of getting data back asynchronously.
If you look closely in the onZipCodeData function, we’re adding the zip code we put in back to the data we get from the service to help us later on. We don’t get the zip code back from the API and it’s a convenient place to store this information.
Next, we create the $scope.addZipCode function which grabs the zip code from the input field and uses our onZipCodeData function to gather the data, then adds that data to the $scope.cities array.
Finally, we create the $scope.refresh function that takes the zip code passed from the view and the index of that item in the $scope.cities array, gets our zip code data the same way $scope.addZipCode does and replaces the data we had in that spot with the new data we retrieved.
angular.module('starter.controllers', ['openWeatherMap'])

.controller('WeatherCtrl', ['$scope', '$window', 'weather', function($scope, $window, weather) {

  $scope.cities = [];
  $scope.input = {};

  function onZipCodeData(zipCode, callBack){

    var prom = weather.getWeatherByZipCode(zipCode);

    prom.then(function(data){
      data.zipCode = zipCode;
      callBack(data);
    }).catch(function(msg){
      $window.alert(msg);
    }).finally(function(){
      $scope.input.zipCode = "";
    });

  }

  $scope.addZipCode = function(){

    var zipCode = $scope.input.zipCode;

    onZipCodeData(zipCode, function(data){
      $scope.cities.push(data);
    });

  };

  $scope.refresh = function(zipCode, index){
    onZipCodeData(zipCode, function(data){
      $scope.cities[index] = data;
    });
  }

}]);
The Device
Everything is looking awesome and now we’re ready to see how it looks on our trusty Android. To do this, run the command ionic platform add android. This will create the android build platform to run on your device. Once this has completed, run the command ionic run android with your device plugged into your computer. This will automatically build and run the app on your device.
Conclusion
One thing you’ll notice is that the data doesn’t save in any way. I’ll leave this as an exercise for the reader and recommend doing something like writing a nice little service around $window.localStorage.
If you would like to see the working set of code written for this post, check it out at github.
As you can see, once everything is all setup, writing apps in the Ionic framework is a breeze, and you can quickly put together powerful mobile applications.