Generating LeetCode Header Images

I’ve been doing a bit of LeetCode and writing blog posts about solving them and how to test edge cases around them. It’s been a lot of fun!
Now that we have a new site layout that requires a header image, I wanted something that made the headers look similar so you knew what to look for, but also had all the other pertinent information about the problem being solved along with it’s difficulty.
After snooping around a bit, I found out that LeetCode is some kind of Single Page Application, supported by an API. I figured out that the API returns all the problems and a ton of data about each of them. I’m not sure how public this API is supposed to be and I didn’t exactly find documentation about it, but it had the few data elements I needed so I’m not going to ask too many questions.
I figured I could made a cool header image for each problem with this data using three things.
- The LeetCode API to get the data I need for each image.
- jq, an unbelievably powerful JSON processor to get the chunks of data I care about from the API
- ImageMagick, another unbelievably powerul CLI tool for processing images.
So the plan is to get the data, parse out what I need and plop it on a .png or whatever. Easy right?
The Environment
I run on both Mac and PC environments, so I wanted this to be cross platform. This means I’m going to use, yes you guessed it, Docker! The Dockerfile is straight forward. I just used an alpine base image and installed ImageMagick and jq
I also copy in a font for ImageMagick to use, otherwise it doesn’t really know what to do if no fonts are available. Here is the file in it’s entirety.
FROM alpine
RUN apk --update --no-cache add file imagemagick jq
WORKDIR /fonts
COPY fonts .
WORKDIR /images
To facilitate loading/saving files more easily I also made a docker-compose.yml file to easily mount drives and such.
version: "3.8"
services:

  image: #docker-compose run image
    container_name: svl-blog-images
    build: utils/
    volumes:
      - "./utils/images:/images"
    stdin_open: true
    tty: true
    entrypoint: "/bin/sh"
If you’re in a terminal at the same location as this file, just run docker-compose run image and it’ll give you a terminal into this container, ready to go. Environment sorted!
Lets get that data
To automate this, I need some information. I found the information I need in an http request which I promptly throw at jq to format into a file for me with this line:
wget "https://leetcode.com/api/problems/all" -q -O - | jq > leetcode_problems
The arguments to wget are the URL I want to request, then -q which makes wget quiet. Next we see a weird one, -O -. The -O means output to a file and the - after it means to stdout so instead of writing to a file, we then use the writing to stdout to pipe the data to jq and output that into a file.
Linux-y CLI tools are as confusing as they are compact. On to the next step!
Plucking the Pieces
Now that we have our data, we need to pull out the parts we care about. All I want is the problem name and the difficulty rating. The number of the problem we want to generate gets passed into the script so we know what to look for in the hay stack.
I break this into a few parts. Lets look at the JSON coming in and the jq command I use, then how to break things out further into variables.
{
  "user_name": "",
  "num_solved": 0,
  "num_total": 1793,
  "ac_easy": 0,
  "ac_medium": 0,
  "ac_hard": 0,
  "stat_status_pairs": [
      {
      "stat": {
        "question_id": 1,
        "question__article__live": true,
        "question__article__slug": "two-sum",
        "question__article__has_video_solution": false,
        "question__title": "Two Sum",
        "question__title_slug": "two-sum",
        "question__hide": false,
        "total_acs": 3975133,
        "total_submitted": 8536147,
        "frontend_question_id": 1,
        "is_new_question": false
      },
      "status": null,
      "difficulty": {
        "level": 1
      },
      "paid_only": false,
      "is_favor": false,
      "frequency": 0,
      "progress": 0
    }
  ],
  "frequency_high": 0,
  "frequency_mid": 0,
  "category_slug": "all"
}
The JSON is huge, so I just pared it down to the outside data and the first problem to be workable for this post.
INFO=$(jq -c "[.stat_status_pairs[] | {id: .stat.question_id, title: .stat.question__title, difficulty: .difficulty.level}] | .[] | select(.id == $NUM)" leetcode_problems)
That is the jq command I use to find the info for a specific problem number. These jq commands are terribly confusing but you can query the data for anything you want and re-build it into your own JSON object, which is what I’m doing.
The command is broken into three parts, mostly broken down between |s. Here are the steps:
- Loop through all the
stat_status_pairsand build objects with the propertiesid,title, anddifficulty. - Smash all those objects into an array
- Find the object in that array where the ID is the number we want.
Woohoo! Now we have a JSON object that would look like:
{
    "id": 1,
    "title": "Two Sum",
    "difficulty": 1
}
Now that we have the JSON in a nicely consumable format, lets get that into some variables with jq -c- r
TITLE=$(echo $INFO | jq -c -r '.title')
DIFFICULTY_NUM=$(echo $INFO | jq -c -r '.difficulty' )

if [[ $DIFFICULTY_NUM -eq 1 ]]
then
  DIFFICULTY="Easy"
  DIFFICULTY_COLOR="#5cb85c"
fi

if [[ $DIFFICULTY_NUM -eq 2 ]]
then
  DIFFICULTY="Medium"
  DIFFICULTY_COLOR="#f0ad4e"
fi

if [[ $DIFFICULTY_NUM -eq 3 ]]
then
  DIFFICULTY="Hard"
  DIFFICULTY_COLOR="#d9534f"
fi

LABEL="$TITLE | $DIFFICULTY"

echo "Making image for problem #$NUM"
echo $LABEL
What a treat! Now we have the data we want, lets make a header image!
Drawing the Header
For our next trick, we’ll be using ImageMagick. This tool definitely lives up to it’s namesake. I am absolutely no expert with this and it took quite a bit of research to figure out how to make this work so I’m just going to go over what it does, since I can’t explain it very well.
Disclaimer There is probably and most definitely a better way to do this in a one-liner or something more elegant.
Here is the header image I want to end up with:
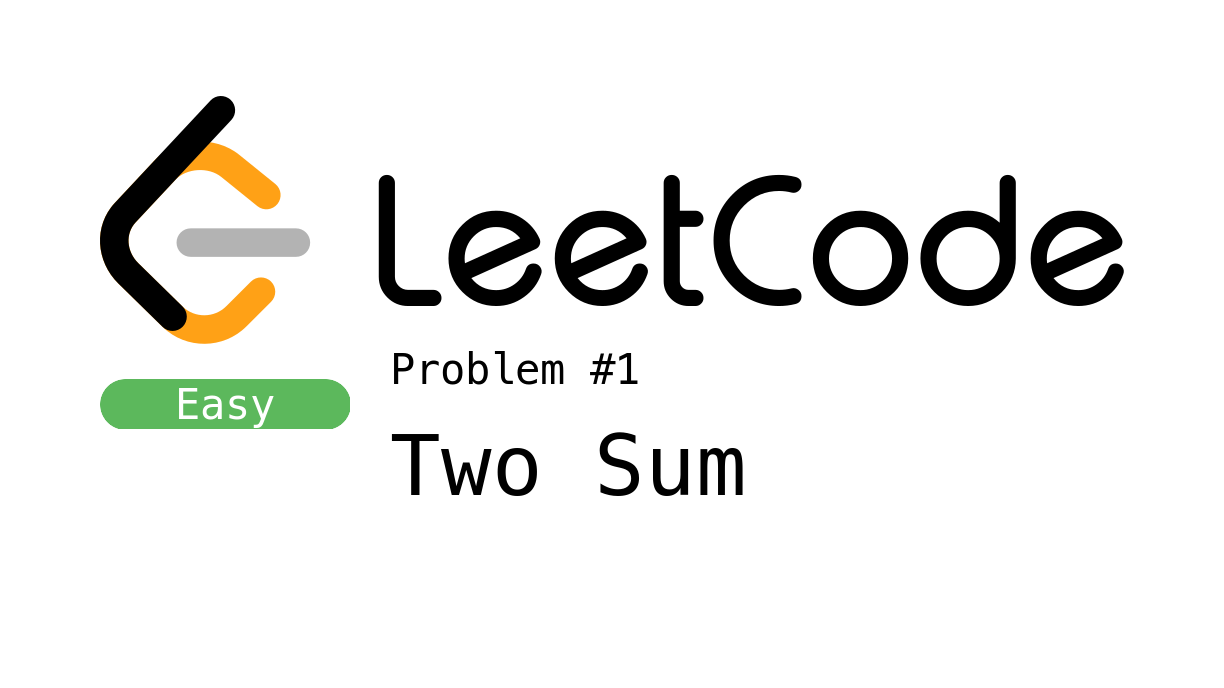
It’s got four main components, the LeetCode logo, the colored difficulty level, the problem number and the problem title. Here is how the script turned out.
convert -background transparent -fill white -gravity center -font /fonts/MesloLGS\ NF\ Regular.ttf -size 250x -pointsize 42 caption:"$DIFFICULTY" _difficulty_text.png
convert -background white -fill black -font /fonts/MesloLGS\ NF\ Regular.ttf -size 725x -pointsize 42 caption:"Problem #$NUM" _problem_num.png

MAX_SIZE=84
POINT_SIZE=$(convert -size 725x185 -font /fonts/MesloLGS\ NF\ Regular.ttf caption:"$TITLE" -format "%[caption:pointsize]" info:)

if [[ $POINT_SIZE -gt $MAX_SIZE ]]
then
  convert -background white -fill black -font /fonts/MesloLGS\ NF\ Regular.ttf -size 725x185 -pointsize $MAX_SIZE caption:"$TITLE" _title.png
else
  convert -background white -fill black -font /fonts/MesloLGS\ NF\ Regular.ttf -size 725x185 caption:"$TITLE" _title.png
fi

convert -size 250x50 xc:white -fill "$DIFFICULTY_COLOR" -draw "roundrectangle 0,0 250,50 25,50" _difficulty_rect.png

composite -compose atop -gravity north leetcode_logo.png blank.png _logo.png #Logo onto the blank
composite -compose atop -gravity center _difficulty_text.png _difficulty_rect.png _difficulty.png #Text onto difficulty
composite -compose atop -gravity center -geometry +140+25 _problem_num.png _logo.png _logo.png #Problem number line
composite -compose atop -gravity center -geometry +140+160 _title.png _logo.png _logo.png #Problem Title
composite -compose atop -gravity west -geometry +0+60 _difficulty.png _logo.png _logo.png #Difficulty Rect
convert -bordercolor white -border 100x20 _logo.png ../leetcode_"$NUM"_header.png #final
I break those components into more and more components, or just smaller image files, then I lay those files on top of each other for the final product. Lets go piece by piece.
First, I want to generate all the text I need. I get the difficulty into a label of text and save that. Then I get the problem number label ready to go.
The problem title itself presents a bit of a problem. I tested it with a short named problem and a long named problem. I tested different sizes to see if I could find a universal font size and it was too much effort. I did find a good maximum size though. With that I was able to use ImageMagick to create the title label and then re-check how big it was. If it was too big to fit in the space I wanted, I remade it with the maximum font size and it worked out perfectly.
Next, I made the oval for the difficulty color.
Finally, I put all the bits together. I start with a blank white template image of the final size I want and put the logo on there. Then I put the difficulty text into the oval. After that I place the problem number label under the logo, and the problem title under that.
I wrap it all up by giving it a margin with a white boarder and output it to the final image.
Conclusion
So there you have it, an automated way to make header images for LeetCode blog posts. I hope you found the tools in this useful and take the time to learn more about both jq and ImageMagick. I had a lot of fun with this project and hope to do similar things in the future.