Creating Popout Buttons for Ionic
I had this idea that it would be really cool to replicate the popout buttons that the Pinterest app has for use with Ionic. Below is a sample picture of the Pinterest app and it’s buttons. Check out the code on GitHub here.

You tap a grid item, and 3 buttons pop out from your tap location so you can act on that item. I thought this would be really cool to replicate using Angular JS and CSS.
Boy, was I wrong. Figuring out how to do this was a bit frustrating at first due to a couple of items.
First off, Ionic’s offsets for absolute positioning of items in a normal page may have a slight bug in it. I’ll explain more about this later.
Second, CSS transformations and timing without using keyframe animations is straight up tough. Animating things dynamically just wasn’t really thought through for CSS3. There are libraries out there to supplement this, but they felt heavy and overkill for what I needed.
Finally, if you get a number close to 0, say around 3.45872354e^-15, in Javascript and want to convert that to a string you can dump into a CSS style, you’re going to have a bad time. Round it off. CSS doesn’t like to set things to “3.45872354e^-15px” and you’ll just get upset because you can’t figure out why everything is being set to 0.
It turned out very nice though, here is a quick demo of it.
Requirements
I had a few requirements in mind for this.
- Nestable tags for the directive
- Some customization of the positioning of the buttons
- Control the directive from the controller
- Icons to slide out from tap location
With this in mind, lets look at the bits of code that make this all happen for us.
Nestable Directive Tags and Customization
The basic idea is to have a central circle, and the other circle buttons to come out radially from that point. To do this I created two directives. One that depends on the other.
The first, which is the directive for the center circle, is the svlPopoutButtons directive. This contains a controller that is setup to allow the sub-directive buttons to register themselves with this directive.
We are restricting it to an element, transcluding everything inside and isolated the scope with a few customizable properties.
The centerOffset property lets you choose how far away the buttons are from the center circle. By default this is 50 pixels.
The radOffset property lets you choose the position of the first button on the circle in radians. By default this is directly above the center circle.
The radStep property lets you choose the number of radians the next button is positioned from the previous button. By default this is π/4.
Here is a sample of the directive, without the link function. That is where the fun stuff comes in and I want to build some anticipation.
angular.module('svl.popout',[])
.directive('svlPopoutButtons', function(svlPopoutDelegate, $timeout){

  var buttons = [];

  return {
    restrict: 'E',
    transclude: true,
    scope: {
      centerOffset: '=',
      radOffset: '=',
      radStep: '='
    },
    controller: function($scope){
      this.addButton = function(button){
        buttons.push(button);
      }
    },
    link: function(scope, element, attrs){
    },
    template: "<div class='circleButton' ng-transclude></div>"
  }
})
Now we need a directive for all the buttons that will come out radially from the center. These will depend on the center button so we use the require: '^svlPopoutButtons' option in our directive to make that dependency on the svlPopoutButton directive. Notice out the outer is plural and the inner tags are singular.
These also require elements and transclude their contents. Here is the entirety of the button’s directive. It doesn’t do a lot. The parent does all the work.
.directive('svlPopoutButton', function(){
  return {
    require: '^svlPopoutButtons',
    restrict: 'E',
    transclude: true,
    scope: {},
    link: function(scope, element, attrs, buttonCtrl){

      element.css('position','absolute');

      var btn = {scope: scope, element: element};
      buttonCtrl.addButton(btn);

    },
    template: "<div class='circleButton' ng-transclude></div>"
  }
})
If you look closely you can see in the link function that we’re passing buttonCtrl. This is the controller we declared in the parent directive. This lets us have some communication between them when things are being setup.
I use this to have the buttons add themselves to the parent directive. They are meant to be pretty dumb. I also set some CSS on the buttons so I can move them freely around the screen.
You’ll also notice that the parent and children directives share a template. Here is the CSS for the circleButton class.
.circleButton{
  -webkit-border-radius: 50%;
  -moz-border-radius: 50%;
  border-radius: 50%;
  border: 3px solid black;
  height: 30px;
  width: 30px;
  text-align: center;
  display: inline-table;
  position: absolute;
  top: 0;
  left: 0;
  box-shadow: 3px 3px 2px #888888;
  cursor: pointer;
}
.circleButton i{
  display: block;
}
.hidden{
  display: none !important;
}
I setup my CSS to make some round divs. You can change it to do whatever you like. The hidden class is used to manually hide some buttons when we’re moving things into position.
Controlling the Directive from the Controller
This part is a neat trick I picked up from digging through some Ionic source code.
We want to be able to control our directive from our controller right? How do we do that? Simple, we cheat!
To cheat, we create a service. This service will be our delegate. It will be initialized with functions that do nothing more than return true, then we override them later.
If you look back to the svlPopoutButtons (plural) directive, you might notice this service being passed into the directive. The trick is that we override our fake functions with the real functions in the directive.
And now, since services are singletons in AngularJS and Javascript gives you the power of closures, we can handle things regarding our directive using the delegate service.
All we want to do is hide and show the buttons, so here is the service that declares those fake functions initially.
.factory('svlPopoutDelegate', function(){
  var del = {};
  var fakeFunctions = ['show','hide'];
  angular.forEach(fakeFunctions, function(fn){
    del[fn] = function(){return true;}
  });
  return del;
});
Now, if we want to hide or show our directive, we just inject the delegate service and call those functions. Here is the controller to show how it works.
angular.module('starter.controllers', ['svl.popout'])
.controller('MainCtrl', function($scope, $ionicPopover,svlPopoutDelegate) {

  $scope.toggled = false;
  $scope.radOffset = -Math.PI/4;
  $scope.radStep = Math.PI/8;

  $scope.showPopout = function($event){
    if ($scope.toggled){
        svlPopoutDelegate.hide();
    } else {
      svlPopoutDelegate.show($event);
    }

    $scope.toggled = !$scope.toggled;
  }
});
Sliding Icons out
The meat of these directives lives in the link function of the parent. Initially, we set the position of the element to absolute so we can place it anywhere. There is a helper translate function created that just makes it easy to set the transforms of the divs in our other functions.
Next, we re-define the show and hide functions of our delegate service to override the fake ones. Then call the hide function to keep our buttons initially hidden.
I’m going to go over the hide and show functions and omit the rest of the link function for this delegate. You can see the entire function here.
The Hide Function
Lets go over the easy function first, the hide function. Here we just add our hidden class and throw our buttons way off into the distance so they can’t be seen.
svlPopoutDelegate.hide = function(){
  element.addClass('hidden');
  translate(element, -1000,-1000);
  angular.forEach(buttons, function(btn){
    translate(btn.element, -1000, -1000);
  });
}
The Show Function
This is where things get a bit gnarly. I had some issues with embedding my directive inside the <ion-content> and <ion-view> tags. They both have the has-header class on them, which offsets your positioning by the height of the header for each tag that has the class.
So, with that in mind, the first thing we do is stop hiding our buttons. Next we find all the objects that have the has-header class and their corresponding offsets. Then we build our total height offset by looping through them and adding them all up. I cut the directives width and height by half to center them on the click.
Now we need to know where our click landed. Ionic has some internal utility functions that I take advantage of to find my tap coordinates and then offset them and place our center circle.
Next, we need to place our buttons. For each button in our list we first translate them to x=0, y=0 coordinates so they are sitting on top of our center button.
We want them to animate, so we can’t immediately set the transform styles or it’ll override the 0 positioning and look like the buttons are flying in from x=-1000 and y=-1000. While this is actually kind of neat looking, it’s not meeting our requirements.
To get them to animate from the center circle, we use the $timeout to fire at the top of the next run loop and translate the elements using CSS so they slide out nicely.
Here is the show function in its entirety.
svlPopoutDelegate.show = function($event){

  element.removeClass('hidden');

  var offsetObjects = document.getElementsByClassName('has-header');
  var totalOffsetHeight = 0;
  var totalOffsetWidth = element[0].scrollWidth/2;

  angular.forEach(offsetObjects, function(el){
    totalOffsetHeight += el.offsetTop + element[0].scrollHeight/2;
  });

  var coords = ionic.tap.pointerCoord($event);
  coords.y -= totalOffsetHeight;
  coords.x -= totalOffsetWidth;

  translate(element, coords.x,coords.y);

  //Make the buttonOffsetDistance and
  var buttonOffsetDistance = scope.centerOffset || 50;
  var radOffset = scope.radOffset || 0;

  angular.forEach(buttons, function(btn){

    translate(btn.element,0,0,0);

    var btnHeight = btn.element[0].scrollHeight/2;
    var btnWidth = btn.element[0].scrollWidth/2;

    $timeout(function(){

      var x = Math.round(Math.sin(radOffset)*(buttonOffsetDistance)-btnWidth);
      var y = Math.round(Math.cos(radOffset)*(-buttonOffsetDistance));

      translate(btn.element, x, y, 0.25);
      radOffset += scope.radStep || Math.PI/4;

    },0);

  });

}
The View
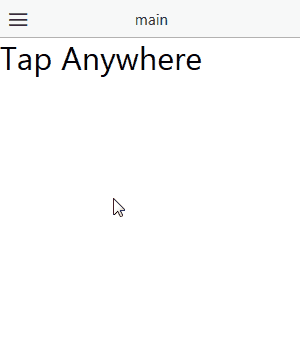
You’re probably wondering what the view looks like in all this. Turns out it’s pretty simple. Here is the entire thing with a couple test ng-click bindings to show that you can actually tap the popouts.
<ion-view view-title="main">
  <ion-content  ng-click="showPopout($event)">
    <h1>Tap Anywhere</h1>
    <svl-popout-buttons>
      <svl-popout-button ng-click="test1()">
        <i class="icon ion-heart"></i>
      </svl-popout-button>
      <svl-popout-button ng-click="test2()">
        <i class="icon ion-wrench"></i>
      </svl-popout-button>
      <svl-popout-button>
        <i class="icon ion-erlenmeyer-flask"></i>
      </svl-popout-button>
      <svl-popout-button ng-click="test3()">
        <i class="icon ion-pizza"></i>
      </svl-popout-button>
      <svl-popout-button>
        <i class="icon ion-beer"></i>
      </svl-popout-button>
      <svl-popout-button>
        <i class="icon ion-leaf"></i>
      </svl-popout-button>
      <svl-popout-button>
        <i class="icon ion-nuclear"></i>
      </svl-popout-button>
      <svl-popout-button>
        <i class="ion-flame"></i>
      </svl-popout-button>
    </svl-popout-buttons>
  </ion-content>
</ion-view>
Conclusion
So there you have it. Some neat and useful popout buttons to do fancy things with your app. I hope you find these useful, and if you think of something neat to add to them don’t hesitate to send me a pull request or to even add an issue to the repo. If people are interested, I wouldn’t mind working on it some more.