Creating a Slidebox Wizard with Ionic

Ionic has an awesome control called the Slide Box. Let’s make a wizard out of it.
I’m also taking this opportunity to show off some of the other form controls Ionic has to offer. You can get all the code at github.
Setup
Step one, like usual, is to start a new project.
ionic start -a "Slide Wizard" -i com.yourawesomeid.slidewizard SlideWizard sidemenu
You can use any template you’re comfortable with, but I like sidemenu because it sets up so much for you immediately, you don’t have to think too hard to get started.
Next, I generally gut the .config function in /js/app.js. Here is what mine came out to be.
.config(function($stateProvider, $urlRouterProvider) {
  $stateProvider

    .state('app', {
    url: '/app',
    abstract: true,
    templateUrl: 'templates/menu.html',
    controller: 'AppCtrl'
  })

  .state('app.wizard', {
    url: '/wizard',
    views: {
      'menuContent': {
        templateUrl: 'templates/wizard.html',
        controller: 'WizardCtrl'
      }
    }
  });
  // if none of the above states are matched, use this as the fallback
  $urlRouterProvider.otherwise('/app/wizard');
});
The Views
Usually I rename a couple of the template files in /templates to be what I’m going to use, and delete the rest.
Now, lets setup the slide box. The directive is very straight forward. Here is a stripped down version containing a few slides from wizard.html. We’ll add a bunch more to it later to act like the animation above.
<ion-view view-title="Slide Wizard">
  <ion-content>
    <ion-slide-box show-pager="false">
      <ion-slide>
        <div class="box">
          <h1>Slide 1</h1>
        </div>
      </ion-slide>
      <ion-slide>
        <div class="box">
          <h1>Slide 2</h1>
        </div>
      </ion-slide>
      <ion-slide>
        <div class="box">
          <h1>Slide 3</h1>
        </div>
      </ion-slide>
    </ion-slide-box>
  </ion-content>
</ion-view>
If you run the code at this point, you’ll have a very simple three slide app. The first thing you’ll notice is that you have to grab the header to actually slide.
This is because the slide box doesn’t take the entire screen. The slides each contain a <div class="box"> tag. I added a box class to the css that gives each slide a height.
Something large will do fine, just know that you’ll be able to scroll it vertically. The footer we’ll add later will always be over the content.
If you look closely you can see we set show-pager="false" in the ion-slide-box tag. The directive comes with it’s own pager, but I wanted to make one from scratch so I turned it off.
There are two more things we need on the view before we start hooking all this up to some data. Every wizard needs some validation, and we need our own pager in place.
Here is the snippet I create to add an error message to the top of the page if something goes wrong.
<ion-view view-title="Slide Wizard">
  <ion-content has-footer="true">
    <div class="card" style="color: red; text-align: center;" ng-show="errorMessage">
      {{errorMessage}}
    </div>
    <ion-slide-box show-pager="false" deletgate-handle="wizard">
      <ion-slide>
The ng-show makes sure it only shows up if there is an actual error message available.
Here we have our footer. It’ll contain two buttons and some text telling us where we are in the wizard.
</ion-content>
  <ion-footer-bar>
    <div class="bar bar-footer">
      <div class="row">
        <div class="col-25">
          <button class="button icon-left ion-chevron-left button-calm" ng-click="back()">
            Back
          </button>
        </div>
        <div class="col-50">
          <div style="text-align: center">
            Step {{slide+1}} of 6
          </div>
        </div>
        <div class="col-25">
          <button class="button icon-right ion-chevron-right button-calm" style="float: right;" ng-click="next()">
            Next
          </button>
        </div>
      </div>
    </div>
  </ion-footer-bar>
Notice that the <ion-footer-bar> tag is outside the <ion-content> tag. The lets Ionic set up our view to always be attached to the bottom of the screen.
The Controller
Now we need a controller. Lets gut the stuff in /js/controller.js and make it our own. I start my completely emptying AppCtrl. You can probably delete it completely, but I like having a controller around for the side menu just in case.
I’d like to generalize these slides a bit, so I made a Slide object. It’s very simple and only contains an isValid function, a list of validators and an error message.
var Slide = function(){
  this.validators = [];
  this.errorMessage = "Something went wrong!";
}
Slide.prototype.isValid = function(){
  if(this.validators.length == 0){
    return true;
  }
  for (var i=0; i < this.validators.length; i++){
    if(!this.validators[i]()){
      return false;
    }
  }
  return true;
}
Inside our controller function, we need to add a couple modules to use. $ionicSlideBoxDelegate and $timeout. $ionicSlideBoxDelegate lets us control our slide box programmatically, and we need $timeout to let Ionic setup it’s directives before we latch on and do the fun stuff.
Our $scope will contain the functions we need to go back and forth on our slides with the controls, information about which slides exist and the current slide we’re on.
We also have a watch on some information the slide box delegate gives us, so we know when we’re changing slides.
$scope.next = function(){
    $ionicSlideBoxDelegate.next();
  }
  $scope.back = function(){
    $ionicSlideBoxDelegate.previous();
  }

  $scope.slide = -1;
  $scope.slides = [];
  $timeout(function(){
    $scope.$watch(function(){
        return $ionicSlideBoxDelegate.currentIndex();
    }, function(index){

      $scope.errorMessage = "";

      //Initial state, don't validate
      if($scope.slide < 0){
        $scope.slide = 0;
        return;
      }

      if($scope.slides[$scope.slide].isValid()){
        $scope.slide = index;
        return;
      } else {
        $ionicSlideBoxDelegate.slide($scope.slide);
        $scope.errorMessage = $scope.slides[$scope.slide].errorMessage;
      }

    });
  },0);
We initialize our first slide position to -1. This is because the index changes to 0 initially and we don’t want to fire our validation on boot up, that’s just silly.
So, when a slide changes, we reset any error message we had previously, check if the current slide we’re on is valid and then change slides if it is.
If the slide is not valid, we use the slide box delegate to bounce back to where we were and display the error message.
Putting it all together
So, obviously the snippets we have don’t do a lot unless we make a bunch of slides and use their data in the view. Here is the code I used to make five slides that use different Ionic controls and validators.
//Setup the slides
  $scope.slide1 = new Slide();
  $scope.slide1.validators.push(function(){
    return $scope.slide1.firstName && $scope.slide1.firstName.length != 0;
  });
  $scope.slide1.validators.push(function(){
    return $scope.slide1.lastName && $scope.slide1.lastName.length != 0;
  });
  $scope.slide1.errorMessage = "Please enter your name!";
  $scope.slides.push($scope.slide1);

  $scope.slide2 = new Slide();
  $scope.slide2.validators.push(function(){
    return $scope.slide2.quest && $scope.slide2.quest.length != 0;
  });
  $scope.slide2.errorMessage = "Choose a quest!";
  $scope.slides.push($scope.slide2);

  $scope.slide3 = new Slide();
  $scope.slide3.validators.push(function(){
    return $scope.slide3.color && $scope.slide3.color.length != 0;
  });
  $scope.slide3.errorMessage = "Please choose a color";
  $scope.slides.push($scope.slide3);

  $scope.slide4 = new Slide();
  $scope.slide4.validators.push(function(){
    return $scope.slide4.african || $scope.slide4.european;
  });
  $scope.slide4.errorMessage = "Choose an air speed!";
  $scope.slides.push($scope.slide4);

  $scope.slide5 = new Slide();
  $scope.slide5.validators.push(function(){
    return $scope.slide5.love > 50;
  });
  $scope.slide5.errorMessage = "You don't love kittens enough!";
  $scope.slides.push($scope.slide5);
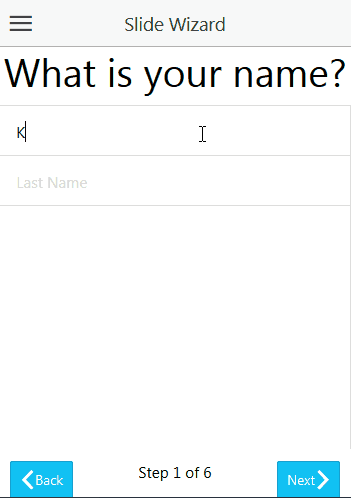
Here is the final view, with the error message, slides and footer. It even contains a final slide showing all the data collected from the first five slides.
<ion-view view-title="Slide Wizard">
  <ion-content has-footer="true">
    <div class="card" style="color: red; text-align: center;" ng-show="errorMessage">
        {{errorMessage}}
    </div>
    <ion-slide-box show-pager="false" deletgate-handle="wizard">
      <ion-slide>
        <div class="box">
          <h1>What is your name?</h1>
          <div class="list">
            <label class="item item-input">
              <input type="text" placeholder="First Name" ng-model="slide1.firstName">
            </label>
            <label class="item item-input">
              <input type="text" placeholder="Last Name" ng-model="slide1.lastName">
            </label>
          </div>
        </div>
      </ion-slide>
      <ion-slide>
        <div class="box">
          <h1>What is your quest?</h1>
          <div class="list">
            <label class="item item-input item-select">
              <div class="input-label">
                Quests
              </div>
              <select ng-model="slide2.quest">
                <option ng-repeat="quest in quests" value="{{quest}}">{{quest}}</option>
              </select>
            </label>
          </div>
        </div>
      </ion-slide>
      <ion-slide class="box">

          <h1>What is your favorite color?</h1>
          <ion-radio value="{{color}}" ng-model="slide3.color" style="color: {{color}}; text-align:left;" ng-repeat="color in colors">
            {{color}}
          </ion-radio>
      </ion-slide>
      <ion-slide>
        <div class="box">
          <h1>What is the airspeed velocity of an unladen swallow?</h1>
          <ion-toggle ng-model="slide4.african" toggle-class="toggle-royal" style="text-align: left;"> African </ion-toggle>
          <ion-toggle ng-model="slide4.european" toggle-class="toggle-royal" style="text-align: left;"> European </ion-toggle>
        </div>
      </ion-slide>
      <ion-slide>
        <div class="box">
          <h1>How much do you love kittens?</h1>
          <div class="item range">
            <i class="icon ion-heart-broken"></i>
            <input type="range" min="0" max="100" value="33" ng-model="slide5.love" />
            <i class="icon ion-heart"></i>
          </div>
        </div>
      </ion-slide>
      <ion-slide>
        <div class="box">
          <h1>FINAL SCORE!</h1>
          <div class="card" ng-repeat="slide in slides">
            <div class="item item-divider">
              Slide {{$index+1}}
            </div>
            <div class="item item-text-wrap">
              {{slide}}
            </div>
          </div>
        </div>
      </ion-slide>
    </ion-slide-box>

  </ion-content>
  <ion-footer-bar>
    <div class="bar bar-footer">
      <div class="row">
        <div class="col-25">
          <button class="button icon-left ion-chevron-left button-calm" ng-click="back()">
            Back
          </button>
        </div>
        <div class="col-50">
          <div style="text-align: center">
            Step {{slide+1}} of 6
          </div>
        </div>
        <div class="col-25">
          <button class="button icon-right ion-chevron-right button-calm" style="float: right;" ng-click="next()">
            Next
          </button>
        </div>
      </div>
    </div>
  </ion-footer-bar>
</ion-view>
And there you have it! Run it with ionic serve and see the beautiful wizard we’ve created together.